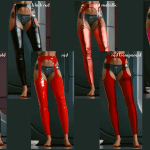


Garter Tights
EXCESSIVELY DETAILED INSTALLATION INSTRUCTIONS
(you can skip it if you already know how this works; there’s nothing new)
On this mod page, click the FILES tab, find the item you want, and hit “Manual Download.” Click “Slow Download” when prompted. Wait for the download to complete, then go to the Downloads folder on your computer.
Double-click the file you just downloaded. If you have 7-Zip or another unzipping program like WinRAR, it should unzip the file automatically. If you don’t already have one, you can download and install 7-Zip for free here. Once you’ve finished installation, right click on the mod file in your Downloads folder and select “Open with…” then “7-Zip File Manager.”
You should now see one or more .archive files called “GarterTights_” and then the name of the item replaced, the modded item, and the color. For example, “GarterTights_RockerjackToFootlessHolo.” Click once on the one that’s the color you want, then hit “Extract” (the blue minus symbol near the top of the 7-Zip window).
A pop-up will ask where you want the file to be copied to. On my computer, because I own the game on Steam, the file path looks like this: C:\SteamLibrary\steamapps\common\Cyberpunk 2077\archive\pc\mod. If you own it from the Epic game store, it will be \EpicLibrary\Cyberpunk 2077\archive\pc\mod, and GOG will be \GOGLibrary\Games\Cyberpunk 2077\archive\pc\mod. IMPORTANT: Check the file path beforehand to make sure there is actually a folder called “mod” in that location. If there isn’t yet, just make one.
Once you have the correct file path entered in the “Copy to:” box in the 7-Zip window, hit “OK.” Start up the game and acquire the replacer item either by buying/looting it or entering the item code in CET. Equip the replacer item (in this example, a rockerjack), and you’re done! Check out your modded item (should appear as the holo variant of the garter tights).
To remove a mod, go to the “mod” folder you created (same file path as the previous step), right click on the .archive file you want to get rid of, and click “Delete.”


